Hello, Users, Deadpool here. Proxy servers are a type of application which fuctions as a gateway between the user and Internet. Squid in one of the most popular open source HTTP caching tool that reduces bandwidth and response times by reusing frequently-requested web pages. With Squid proxy server you can have access to blocked websites and regional contents based on the proxy location. It also supports extensive numbers of access control rules which makes it a great server accelerator and proxy manager. It runs on most of the available operating systems, including Windows, Linux and is licensed under the GNU GP. In this article we will learn how to install & configure Squid proxy server with 99RDP CentOS 7 VPS: Lets proceed to install & configure Squid Proxy server:
Required Prerequisites
- 99RDP CentOS 7 VPS
- Access to Terminal/Command line
- Root/Normal User with Sudo privileges
- apt package installer
- Text editor such as vi or nano
- Client Machine(for testing)
Installing Squid Proxy and HTTPd Package
Run the given commands in the cli to update & install the packages, my OS is updated and the packages are already installed on the VPS, in the given image so please don’t get confused.
- Updating your CentOs7 VPS to ensure that you are working with the latest version of CentOs
“sudo yum update”
- Installing Squid Package On CentOS 7 VPS
“yum -y install squid”
- Start the Squid service by entering the command
“systemctl start squid”
- To start Squid Service automatically at boot enter the given command
“systemctl enable squid”
- Type in the command to install HTTPd tool,
“sudo yum -y install httpd-tools”
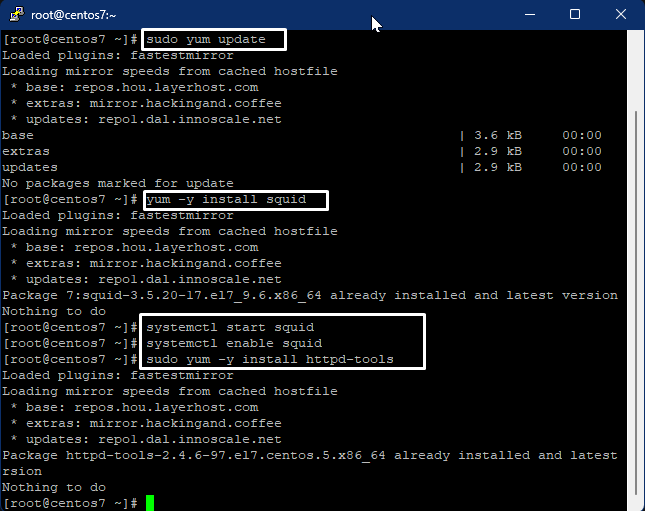
These are the basic steps to install squid and httpd package which are required to run the Proxy Server. HTTPd plays the role of server in a client-server model(Squid Proxy Server Model) using HTTP or HTTPS network protocols. HTTPd waits for the incoming client requests and for each request it answers by replying with requested information.
Enabling Firewall Rules
- In this Squid proxy configuration I am going to use a permanent TCP rule for port 3128
“sudo firewall-cmd –permanent –add-port=3128/tcp”
- Now reload the firewall to apply this new rule by typing
“sudo firewall-cmd –reload”
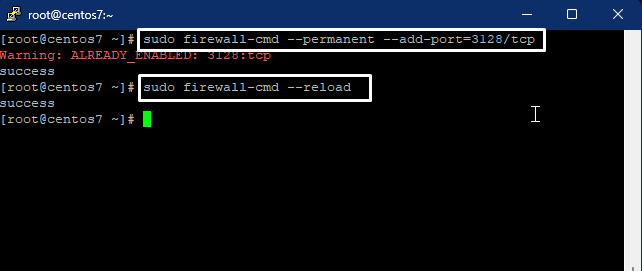
You can open any ports of your choice but as squid listens on port 3128 by defult, I am gonna use that. add the firewall rule with the fisrt command and then reload the firewall to apply the new rule.
Configuring Squid Proxy Server
- Enter the given command to open the conf file of Squid Proxy Server using vi editor, by default the file is located at /etc/squid.
“sudo vi /etc/squid/squid.conf”
- Press I to edit the opened squid.conf file, there are some example rule in the conf file for accessing the proxy server on your local network. To access the server beyond localnet we have to add a new rule at the bottom of the ACL list. In short we have to bring the server to light so that other users can enjoy it. To make the server more secure we are also going to add some authentication parameters. By default the https_ access is denied thus we have to allow the http_access rule therefore the server can send and get requests over http.
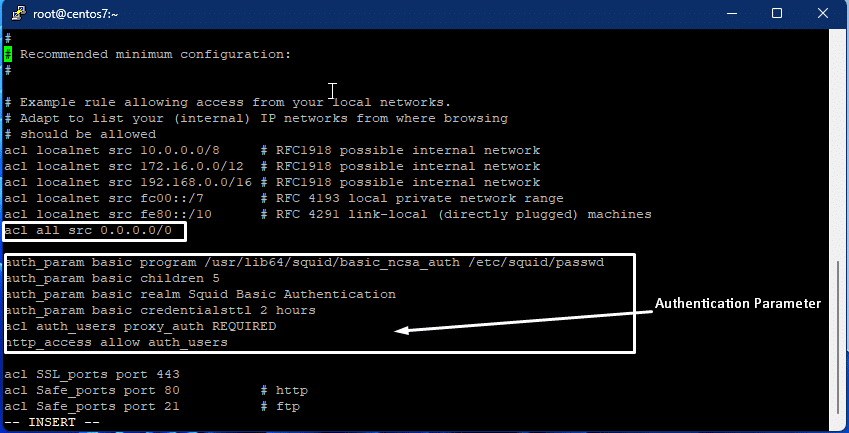
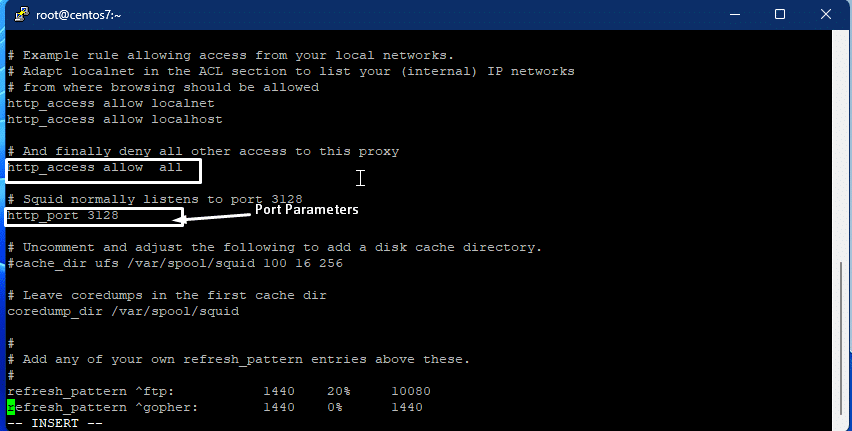
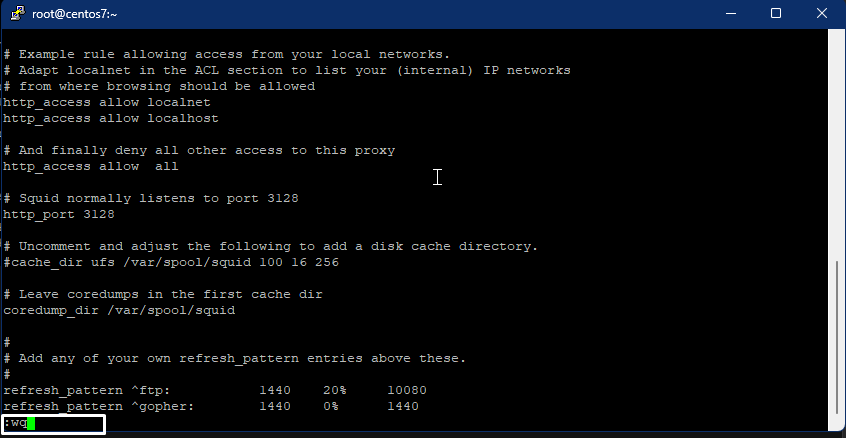
- Enter out the edit mode of .conf file by pressing Esc, type in :wq press enter to write and quit the file.
Within the http_port parameter you can add more rules to allow the proxy to listen on different ports for different users. For example you can add multiple http_port parameter to the confuiguration file allowing squid server to listen on multiple ports. To do so type in http_port 4353 parameter. Afterward add the firewall rule for port 4353 and reload the firewall. Now the squid proxy server is ready to listen on ports 4353 and 3128. Accordingly within the ACL rules you can also set your proxy server to run on selected weekdays(Mon,Tus,Fri).
Adding new user and password For Squid Proxy Server
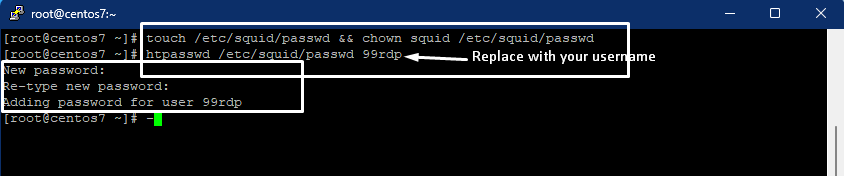
- Create a new file named passwd which will store the username for authentication.squid allowing only authenticated users to connect.
“touch /etc/squid/passwd && chown squid /etc/squid/passwd”
- Create a new User
“htpasswd /etc/squid/passwd newuser ” //change newuser with your username
- Type the password and confirm it.
Wihout the authentication parameter the proxy server can be accessed by anyone who knows the IP and defult port of the server. With the authentication parameter the proxy server authenticate/match each user request to the saved passwd file and then allows the access to the server for authenticated users only.
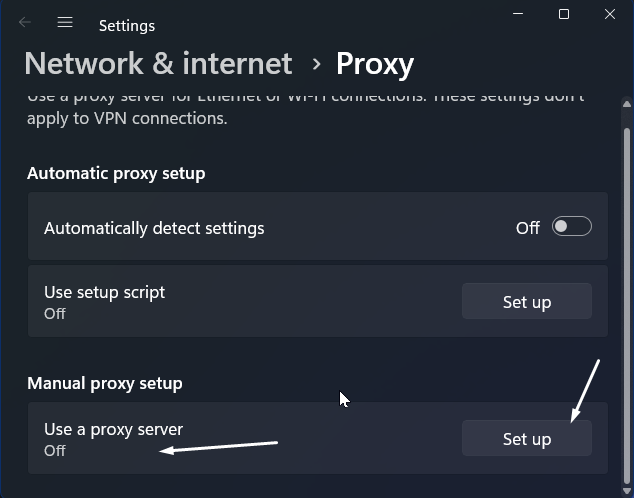
Accessing The Squid Proxy server On Client Side
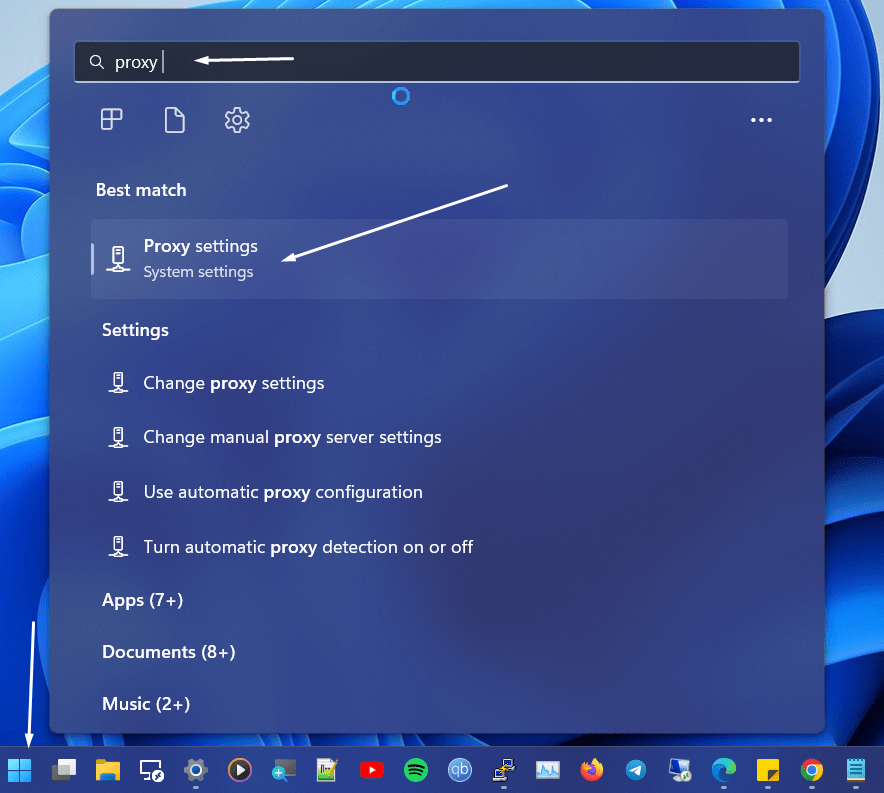
- Click on windows start icon and type in Proxy Settings,
- Goto Manual Proxy Setup
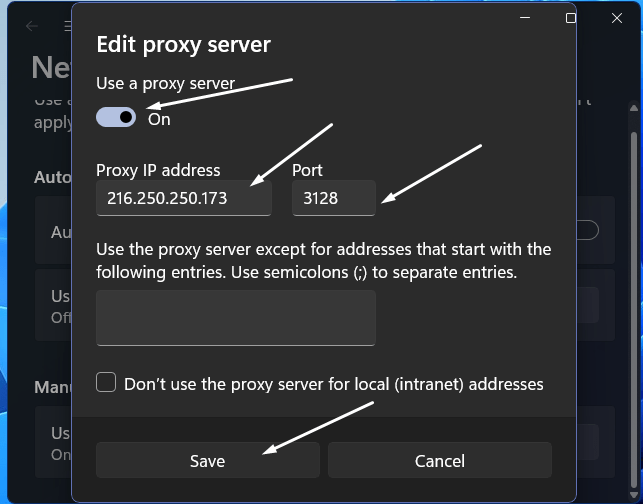
- Enable Use a Proxy Server, Type in the IP and port to connect the server, click on Save.
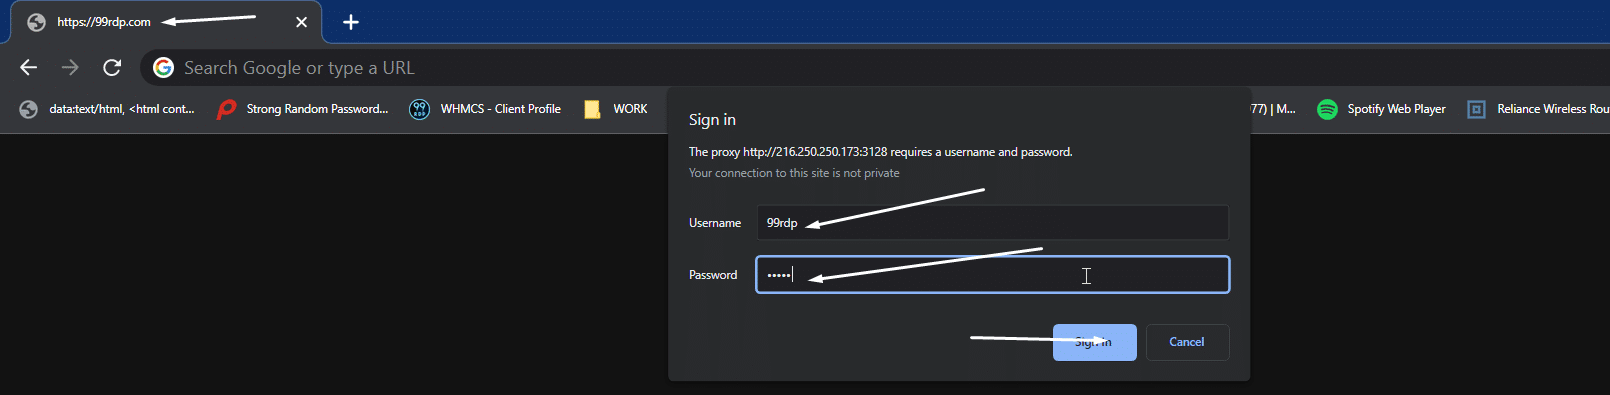
- Open Google Chrome and search for 99RDP and press enter, once you press enter chrome will ask for authentication, In the meantime enter the username and password for the proxy server and click OK.
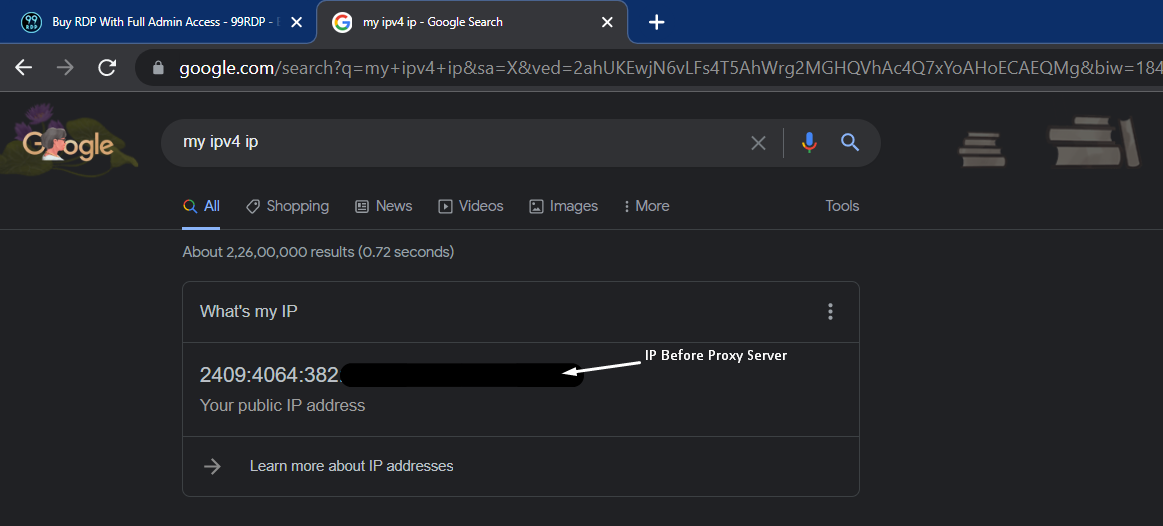
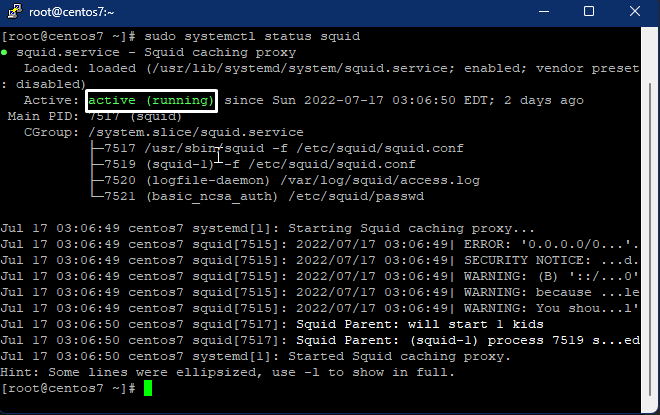
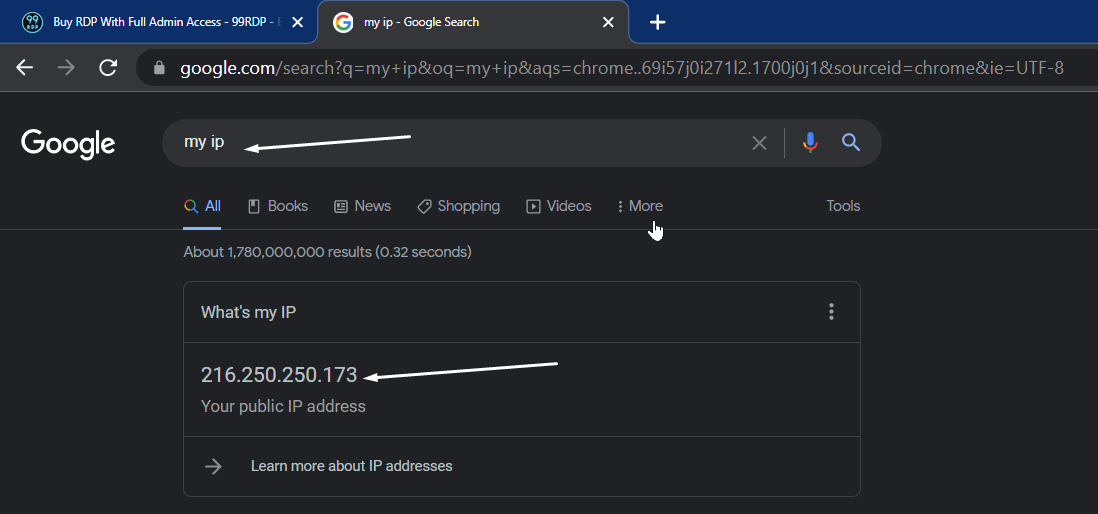
Status Of Squid Proxy Server
- Firstly, enter the given command to check the status of the proxy server
“sudo systemctl status squid”
- Lastly, Google your IP on the client machine, it will be same as the Proxy Server IP.
Conclusion
In this tutorial you have learned how to install & configure Squid Proxy Server. You can use the same server to maintain different users connecting through differnt port and user name. However if you still face any trouble feel free to contact us. That’s it for today Thank You for the time


