Setting up an FTP server on Ubuntu using vsftpd (Very Secure FTP Daemon) is a great way to share files securely. In this guide, we’ll walk you through the installation and configuration process.
Step 1: Update the System
Before installing vsftpd, update your package list to ensure you have the latest versions:
sudo apt update && sudo apt upgrade -y
Step 2: Install vsftpd
Install the vsftpd package using the following command:

sudo apt install vsftpd -y
Step 3: Configure vsftpd
Open the vsftpd configuration file:
sudo nano /etc/vsftpd.conf
Modify or add the following lines: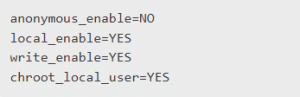
anonymous_enable=NO
local_enable=YES
write_enable=YES
chroot_local_user=YES
Save and exit the file.
Step 4: Restart and Enable vsftpd
Apply the changes by restarting the service:
sudo systemctl restart vsftpd
sudo systemctl enable vsftpd
Step 5: Create an FTP User
To allow a specific user to access the FTP server, create a new user:![]()
sudo adduser ftpuser
Set a password and complete the prompts.
Step 6: Adjust Firewall Rules
If UFW (Uncomplicated Firewall) is enabled, allow FTP traffic: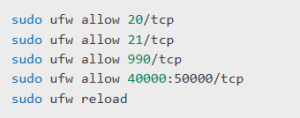
sudo ufw allow 20/tcp
sudo ufw allow 21/tcp
sudo ufw allow 990/tcp
sudo ufw allow 40000:50000/tcp
sudo ufw reload
Step 7: Connect to the FTP Server
You can now connect to the FTP server using an FTP client like FileZilla or by running:
ftp <your-server-ip>
Log in with the FTP user credentials and start transferring files.
How to Set Up an FTP Server (vsftpd) on Ubuntu (F.A.Q)
How do I check if vsftpd is running?
Run the following command:
sudo systemctl status vsftpd
Can I enable FTP access for anonymous users?
Yes, modify the vsftpd.conf file and set anonymous_enable=YES, but this is not recommended for security reasons.
How do I change the default FTP directory?
Edit /etc/vsftpd.conf and set local_root=/path/to/directory, then restart vsftpd.
How do I secure vsftpd with SSL?
Generate an SSL certificate and enable SSL by adding ssl_enable=YES in vsftpd.conf.