99RDP Support: Your Ticket to Assistance in WHMCS!

Creating a support ticket through the WHMCS client area is a simple and efficient way to seek assistance or report any issues you may encounter while using various services, including 99RDP. This guide will walk you through the step-by-step process of creating a support ticket for 99RDP , ensuring a smooth and hassle-free experience for users.
99RDP
Step 1: Navigate to the WHMCS Client Area
Initiate the process by logging into your WHMCS client area with the provided credentials. As soon as you gain access, direct your attention to the navigation menu, where you will find the pivotal options of “Support” or “Open Ticket.” These choices serve as the gateway to personalized assistance, enabling you to seamlessly communicate your queries or concerns. This active engagement ensures a user-friendly experience, empowering you to take control of your support needs within the WHMCS platform. The simplicity of this approach underscores the commitment to user convenience and effective communication for a smoother support ticket creation process.
Step 2: Locate the Support or Tickets Section
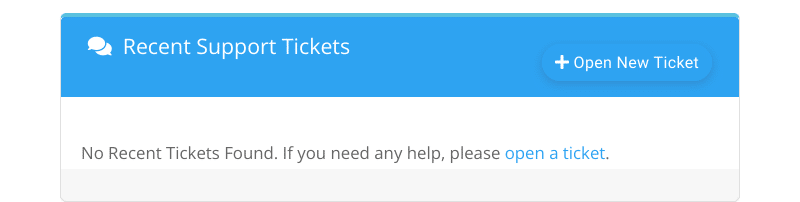
Navigate through your WHMCS client area by logging in with your credentials. Once inside, actively search for the “Recent Support Tickets” section. As you explore this section, you’ll find a streamlined overview of your recent interactions with the support system, providing valuable insights into your ongoing or resolved concerns. This user-friendly design ensures easy access and efficient monitoring of your support tickets, contributing to a seamless experience in managing your inquiries and maintaining a transparent communication channel with 99RDP’s support team.
Step 3: Choose the Appropriate Department
99RDP may have multiple departments for different types of support requests. Select the department that best fits your inquiry. Common categories include technical support, billing, or sales.

Step 4: Create Your Ticket
Once in the appropriate department, click on the “Open Ticket” or similar button. This will take you to a form where you can compose your ticket. Provide a descriptive subject that summarizes your request and detail the issue in the message body.
Step 5: Attach Relevant Information
If your request involves specific details or files, use the attachment option to include relevant information. This helps support agents understand your situation better and accelerates the resolution process.
Step 6: Select Priority and Submit
After determining the urgency of your request, proceed to select the appropriate priority level for your ticket. Once you have furnished all the necessary information, take a moment to review your ticket. Subsequently, click the “Submit” or “Create Ticket” button to initiate the process. This step-by-step approach ensures that your support ticket is not only tailored to the urgency of your situation but also accurately conveys the essential details needed for effective assistance.
Step 7: Monitor Ticket Status
After submitting your ticket, keep an eye on its status. WHMCS typically provides updates such as “Open,” “In Progress,” or “Closed.” This allows you to track the progress of your request.
Explore More; VDI vs. RDP: Which is Right for Your Business?


