Brute-force attacks are a common threat to servers, where attackers repeatedly attempt to guess login credentials. Fail2Ban is a powerful security tool that helps protect your server by monitoring log files and banning suspicious IP addresses after multiple failed login attempts. In this guide, we’ll walk you through setting up Fail2Ban on your Linux server.
Step 1: Install Fail2Ban
Fail2Ban is available in most Linux distributions’ package managers. To install it, run the following command: 
sudo apt update && sudo apt install fail2ban -y   # Debian/Ubuntu
sudo yum install epel-release && sudo yum install fail2ban -y  # CentOS/RHEL
Once installed, start and enable the Fail2Ban service:
sudo systemctl start fail2ban
sudo systemctl enable fail2ban
Step 2: Configure Fail2Ban
Fail2Ban’s default settings are stored in /etc/fail2ban/jail.conf. However, you should not modify this file directly. Instead, create a local configuration file:
sudo cp /etc/fail2ban/jail.conf /etc/fail2ban/jail.localOpen the file for editing:
sudo nano /etc/fail2ban/jail.localFind the [DEFAULT] section and adjust these key settings:
- bantime: Duration an IP stays banned (e.g.,
bantime = 600for 10 minutes). - findtime: Time window for detecting failed attempts (e.g.,
findtime = 300for 5 minutes). - maxretry: Number of failed attempts before banning (e.g.,
maxretry = 5).
Step 3: Enable Jail Rules
Fail2Ban uses “jails” to monitor specific services. To enable SSH protection, find the [sshd] section and set: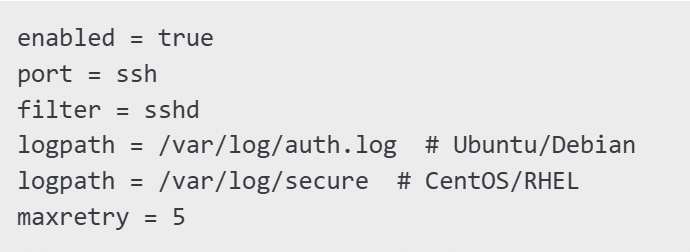
enabled = true
port = ssh
filter = sshd
logpath = /var/log/auth.log  # Ubuntu/Debian
logpath = /var/log/secure  # CentOS/RHEL
maxretry = 5
Save and exit the file.
Step 4: Restart Fail2Ban
Apply the changes by restarting Fail2Ban:
sudo systemctl restart fail2banYou can check the status with:
sudo fail2ban-client status sshdStep 5: Unban an IP (If Needed)
If you accidentally get locked out, you can unban your IP:
sudo fail2ban-client set sshd unbanip YOUR_IP_ADDRESSConclusion
Fail2Ban is a crucial tool for securing your server against brute-force attacks. By configuring its settings properly, you can effectively block malicious attempts and enhance your server’s security.
Set Up Fail2Ban to Protect Against Brute-Force Attacks (F.A.Q)
How can I check banned IP addresses?
Run:
sudo fail2ban-client status sshdThis will display a list of currently banned IPs.
How do I whitelist an IP in Fail2Ban?
Add the IP to the ignoreip line in /etc/fail2ban/jail.local:
ignoreip = 192.168.1.1Restart Fail2Ban afterward.
Can Fail2Ban protect services other than SSH?
Yes, Fail2Ban can monitor logs for various services like Apache, Nginx, and Postfix. You can enable specific jails in the configuration file.
How do I permanently ban repeat offenders?
Set a longer ban time in jail.local:
bantime = -1 # Permanent banRestart Fail2Ban to apply changes.