Redis (Remote Dictionary Server) is a distributed, in-memory key-value database, cache, and message broker with optional durability. Redis popularised the concept of a system that can function as both a store and a cache. It was designed in such a way that data is always modified and read from main computer memory, but it is also stored on disc in an unsuitable format for random data access. When the system restarts, the formatted data is only reconstructed into memory. Redis also has an unusual data model when compared to a relational database management system (RDBMS). User commands do not describe a query to be run by the database engine, but rather specific operations performed on the database. In this guide we will explain how to install Redis server on CentOs 7.
Requirements
- 99RDP VPS/Dedicated Server(Running CentOs 7)
- Access to terminal
Steps To Install Redis Server On CentOs 7
Let’s start the process by updating the current system packages and repo. To do so run the given command in terminal. It is usually a good idea to run this command before starting any new installation to ensure that all installed packages are up to date. Also we need some packages for redis binary.
# yum update
# yum groupinstall ‘Development Tools’
# yum install gcc make wget tcl
Once the update and packages are installed we can head to the Redis website to get the link of latest stable .tar.gz file. Once you have the link copied for CentOs 7, run the given command n terminal.
# wget https://download.redis.io/redis-stable.tar.gz
As the download is finished we can start extracting the file using the given command.
# tar -xzvf redis-stable.tar.gz
After that goto the the extracted folder using the given command.
# cd redis-stable
Once you are in the extracted directory, run the given commands to install the Redis server.
# make
Depending on your server resources, the make process may take some time; once completed, the following message will be displayed on your screen:
make[1]: Entering directory `/root/redis-stable/src'

Hint: It's a good idea to run 'make test' ;)

make[1]: Leaving directory `/root/redis-stable/src'
Now run the make test command to verify that everything is built correctly.
# make test
Once everything is verified we can run the installation command to install redis binaries.
# make install
Redis Server Is installed successfully on CentOs 7 VPS.
Create A Redis User
To create a redis user named test enter the given command in terminal .
# groupadd test
# adduser –system -g test –no-create-home test
After this create a directory named test which will store the Redis database. After that give the test user and group ownership over the directory:
# mkdir -p /test
# chown test: /test
Then give the correct permissions to the directory with the given command.
# chmod 770 /test
Configure Redis Server On CentOs 7
Now that Redis is installed you’ll need to modify the configuration file. Open the redis .conf file with your favourite editor.
# nano redis.conf
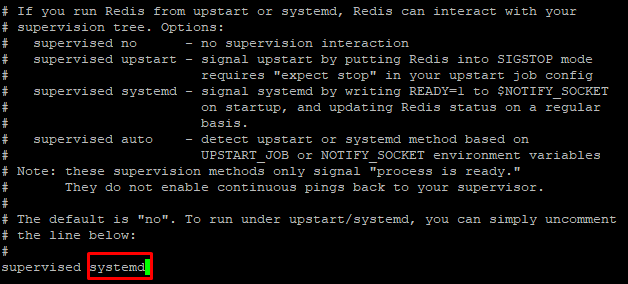
Once the file is opened make changes to the given line.
Next search for the working directory line and replace it with the directory test like this.
Once done save and close the file.
Conclusion
In this guide we learned the steps to install Redis server on CentOs 7. We also learned how to create a Redis user and modify the redis.conf file. Of course, if you are a 99RDP customer, you do not need to install tar.gz in CentOS, simply ask our administrators, sit back, and relax. Our administrators will immediately install tar.gz in CentOS for you.


