Enable Ping for Windows Server 2019 to send an Internet Control Message Protocol echo request message to verify IP-level connectivity with another TCP/IP computer. Receipt of the corresponding echo reply message is displayed along with the round-trip time. Ping is the primary TCP/IP command used for troubleshooting connectivity, reachability, and name resolution. Windows Server 2019 default installation blocks the ICMP traffics, and ping. This is Microsoft’s way of keeping users safe. However, while using a Dedicated Server it is necessary that your server accepts ICMP traffics from certain hosts. In order to connect to an external host over the cloud. Enabling ping will also help you monitor and troubleshoot network issues for your host. In this article, we will learn how to enable ping for Windows Server 2019.
To enable Ping we can disable the whole Firewall. However, this is not recommended as Windows Firewall does a good job of providing basic system protection. Allow only the specific rules required for the ping to succeed.
Enable ICMP Rule To Allow Ping Reply On Windows Server 2019 (GUI)
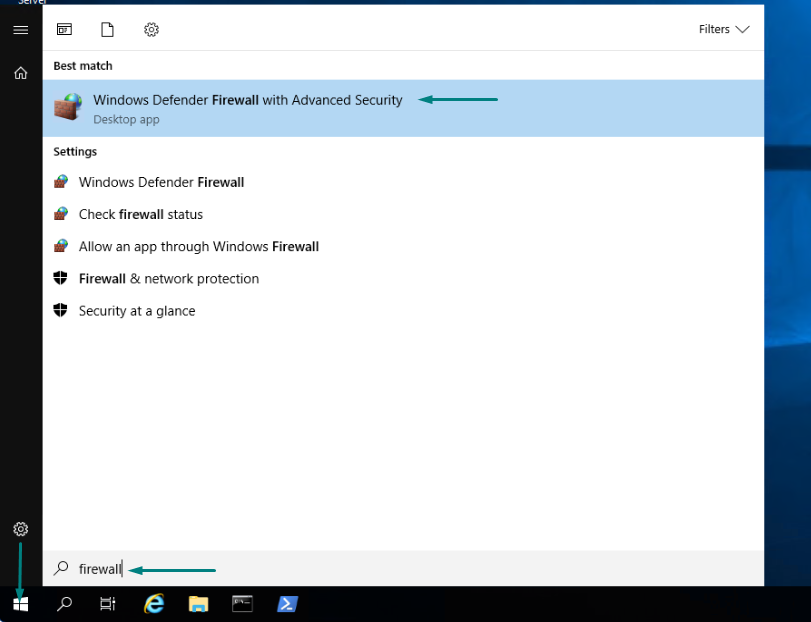
- Firstly Sign In to your Windows Server 2019 DS after that we need to open the Windows Firewall. This can be done in many ways but we are going to use a simple search by typing “firewall” in the start menu. Open it.
- In the Windows Firewall, select Inbound Rules and look for “File and printer Sharing (Echo Request – ICMPv4-In)”. Right-Click on it to Enable the rule.
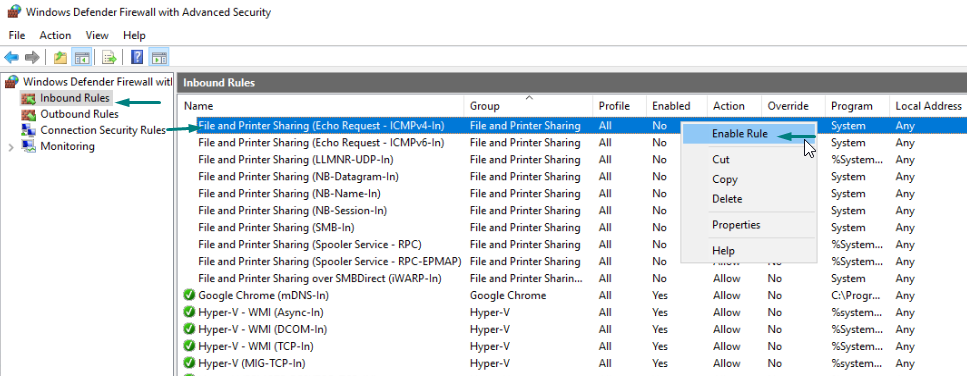
Note that this will only allow IPv4 requests in, if you need IPv6 then you have to enable the “File and Printer Sharing (Echo Request – ICMPv6-In)” rule, listed just below.
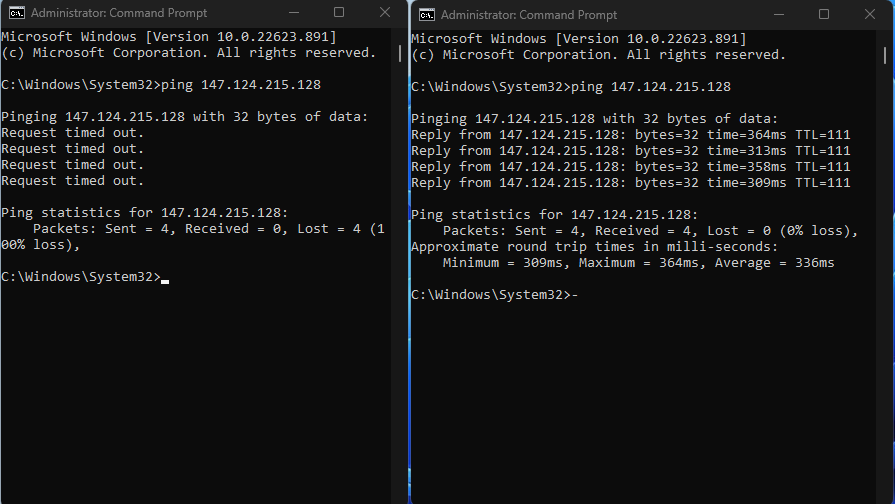
- When enabled, the server will respond to ping requests. I started pinging my Windows Server 2019 virtual machine at 147.124.215.128 before activating the rule and again after activating the rule. Below you can see that the first few requests timed out because incoming ICMP requests are disabled by default in Windows Server 2019. After enabling the ICMP rule, the ping request succeeds and confirms that it is working as expected.
Enable Ping With PowerShell Command
Run Powershell “As An Administrator” and run the given command to create an exception for the rules.
For ICMPv4 rule:
#netsh advfirewall firewall add rule name=”ICMP Allow incoming V4 echo request” protocol=”icmpv4:8,any” dir=in action=allow
For ICMPV6 rule:
#netsh advfirewall firewall add rule name=”ICMP Allow incoming V6 echo request” protocol=”icmpv6:8,any” dir=in action=allow
Disable Ping With PowerShell Command
For ICMPv4 rule:
#netsh advfirewall firewall add rule name=”ICMP Allow incoming V4 echo request” protocol=icmpv4:8,any dir=in action=block
For ICMPV6 rule:
#netsh advfirewall firewall add rule name=”ICMP Allow incoming V4 echo request” protocol=icmpv4:8,any dir=in action=block
Ping is a useful utility for troubleshooting and detecting the presence of network devices, so enabling or disabling ping depends entirely on your environment’s network security policy. This guide provided simple steps that can be performed from the GUI and PowerShell to Enable/Disable Ping reply.


