Do you want Windows Server 2016 to allow RDP? Do you need to create remote connections but are unsure how to proceed? Do you want to use a PowerShell or Command Prompt terminal to configure remote desktop? You can get help with the configuration and get the answers to your problems from our how-to guide.
Introduction
Remote Desktop Protocol (RDP) is a valuable feature that allows you to access and manage your Windows Server 2016 from a remote location. This step-by-step guide will show you how to enable RDP on your Windows Server 2016 using both the command prompt and PowerShell. With RDP enabled, you can manage your server more conveniently and efficiently.
What makes Windows Server 2016 a better choice?
We covered how to enable RDP on Windows Server 2012 in a previous article. It’s now time to introduce Windows Server 2016 and walk you through the process of turning on Remote Desktop in Windows Server 2016. However, let’s begin with a quick overview of Windows Server 2016.
The replacement for Windows Server 2012 R2, which was released in October 2016, is Windows Server 2016. The Windows Server families are on their eighth release.
Why Enable RDP on Windows Server 2016
Enabling RDP on your Windows Server 2016 offers several benefits, including:
- Remote Management: Access your server from anywhere, providing flexibility and convenience.
- Saves Time: It eliminates the need to be physically present in front of the server.
- Troubleshooting: Easily diagnose and fix issues remotely.
- Cost-Efficient: Reduces the costs associated with on-site maintenance.
Prerequisites
Before you begin, make sure you have:
- A Windows Server 2016 machine.
- Administrator access to the server.
- A stable internet connection.
- Knowledge of the server’s IP address.
Step 1: Login to Your Windows Server 2016
First, log in to your Windows Server 2016 using your administrator credentials. You must have admin privileges to enable RDP.
ALSO READ : Setting Up MikroTik Port Forwarding Using Winbox: Configuration Guide

Step 2: Accessing the Control Panel
After logging in, navigate to the Control Panel. You can find the Control Panel by clicking the Start button and searching for it in the Windows menu.

Step 3: System Properties
Within the Control Panel, locate and click on “System and Security.” Then, click on “System.” This will take you to the System Properties window.

Step 4: Remote Settings
In the System Properties window, find and click on “Remote settings” on the left-hand side. This will open the Remote tab.

Step 5: Enable Remote Desktop
In the Remote tab, you will find a section called “Remote Desktop.” Click on the option that says, “Allow remote connections to this computer.”
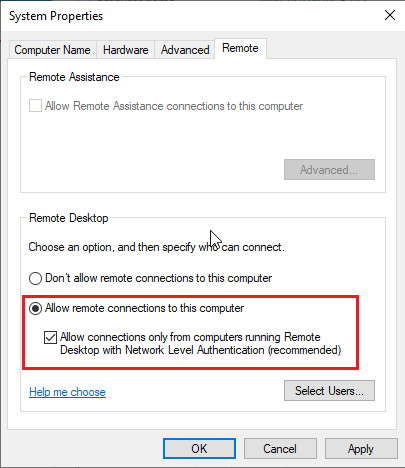
Step 6: Confirm Your Selection
You will be prompted to confirm your selection. Click “Apply” and then “OK” to enable RDP.

Step 7: Configure Firewall Settings
To ensure that RDP traffic can reach your server, you need to configure your server’s firewall to allow incoming RDP connections. You can do this by creating an inbound rule to allow RDP traffic on port 3389.
Step 8: Verify RDP Access
Now that RDP is enabled, you can use a remote desktop client to connect to your server using its IP address. Ensure that you have a secure connection and can successfully log in.
Using PowerShell to Enable RDP
If you prefer using PowerShell, you can enable RDP with a few simple commands. Open PowerShell with administrative privileges and enter the appropriate commands.
Troubleshooting Common Issues
Sometimes, issues may arise when enabling RDP. Common problems include firewall misconfigurations, incorrect credentials, or network issues. This section will help you troubleshoot and resolve these issues.
Best Practices for RDP Security
While RDP is a powerful tool, it can also be a security risk if not properly configured. Implement best practices to secure your RDP access, including strong passwords, network-level authentication, and regular updates.
ALSO READ : How to Download any Video from any Website on Chrome for FREE 2023
Conclusion
Enabling RDP on your Windows Server 2016 is a practical and efficient way to manage your server remotely. With the step-by-step guide provided here, you can easily enable RDP using both the Command Prompt and PowerShell. Remote access simplifies server management, saves time, and enhances your overall server administration experience.
We discovered several ways to activate RDP on Windows Server 2016 in this article. Here, we can discuss one more technique. Windows Server 2016 has external Remote Desktop Access turned off by default. As we detailed in a previous article titled “how to enable RDP in Windows Server 2012,” we can simply enable it using Server Manager. Therefore, you can utilize Windows Server 2016’s server manager to allow remote connections. Do you know of any other techniques? Please let us know.


