WinSCP is a versatile and free file transfer client that allows you to securely transfer files between your computer and remote servers. With support for FTP, SFTP, and SCP protocols, it’s popular among beginners and advanced users alike. In this guide, we’ll walk you through connecting to an FTP server using WinSCP.
Step 1: Download and Install WinSCP
- Visit the WinSCP download page and download the latest version.
- Open the downloaded installer file and follow the on-screen instructions to install WinSCP.
- Once installed, open WinSCP.
Step 2: Gather FTP Server Credentials
Before connecting, you’ll need some information about your FTP server. Gather the following details:
- Host name: The server’s IP address or domain name (e.g., ftp.yourwebsite.com).
- Port number: Usually
21for FTP (though SFTP uses22). - Username: Provided by your hosting provider or system administrator.
- Password: Assigned by the hosting provider.
Step 3: Configure Your FTP Connection in WinSCP
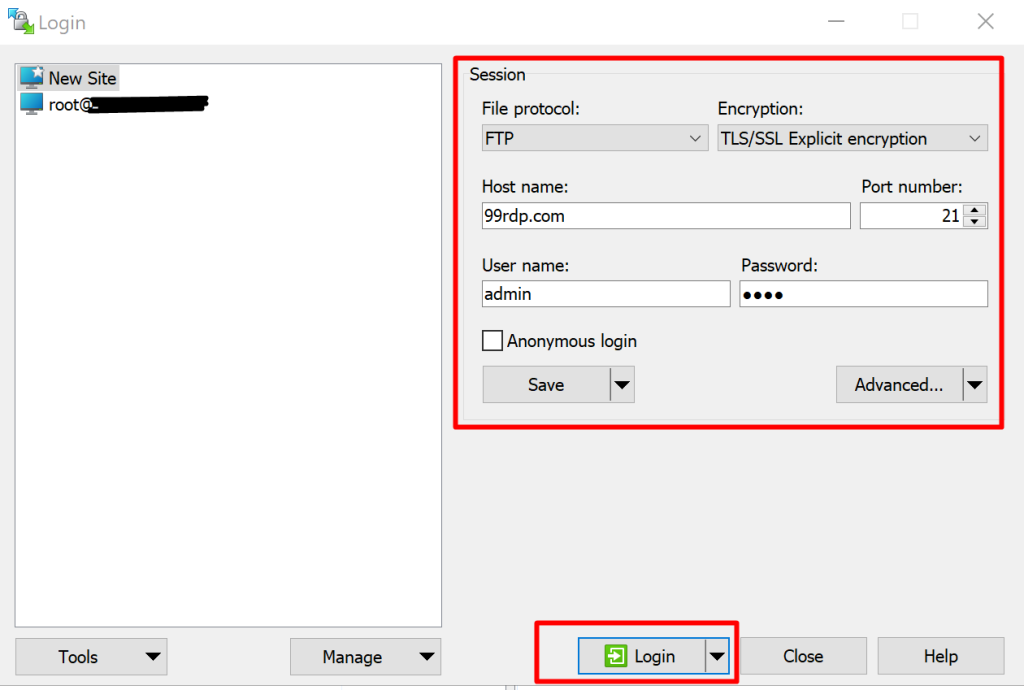
- Open WinSCP. You’ll see a login screen with fields to enter your server details.
- Choose FTP from the “File Protocol” dropdown menu.
- Enter the host name, port number (21 for FTP), username, and password in their respective fields.
- (Optional) If you’re connecting over a secure connection, select TLS/SSL Explicit encryption for additional security.

Step 4: Save and Connect
- To save your connection settings for easy access in the future, click Save and give the connection a recognizable name (e.g., “My FTP Server”).
- When you’re ready to connect, click Login. If it’s your first time connecting to this server, you may see a warning about the server’s certificate; you can choose to trust it if it’s from a trusted source.
- Once connected, you’ll see a split-pane interface:
- The left pane displays your local files.
- The right pane displays the remote server files.
Step 5: Transfer Files
- To upload files, navigate to the desired directory on your local computer in the left pane and the target directory on the server in the right pane.
- Drag files from the left pane to the right pane to upload them to the server.
- To download files, drag them from the right pane to the left pane.
Step 6: Manage and Disconnect
- Use WinSCP’s built-in features, such as renaming files, creating folders, or editing files directly on the server, to manage files more effectively.
- When you’re finished, close the session by clicking Session > Disconnect or simply close the application.
Additional Tips
- Using Keep Alive: If your connection times out frequently, you can configure a keep-alive setting under Advanced > Connection > Keepalives to help maintain your session.
- Synchronizing Directories: WinSCP provides a synchronization tool for keeping files between local and remote directories updated.
Conclusion
Connecting to FTP with WinSCP is straightforward once you’re familiar with the layout. With powerful features like direct file editing, drag-and-drop support, and directory synchronization, WinSCP is an excellent tool for anyone needing reliable and secure file transfers.
Conclusion
Resetting the root password on an Ubuntu VPS is a straightforward process that can be done via recovery mode or using a live environment. Always ensure that your root password is securely stored to avoid lockout situations in the future. Additionally, consider using SSH keys for secure access, which eliminates the need to manage passwords altogether.
Reset the Root Password on an Ubuntu VPS (F.A.Q)
What is the default port for FTP in WinSCP?
The default port for FTP is 21. For secure FTP connections (FTPS), port 990 is often used, and for SFTP (over SSH), port 22 is standard.
How can I save my FTP login details in WinSCP?
After entering your FTP credentials, click Save on the login screen. Give your session a name for easy access in the future.
Can I transfer multiple files at once in WinSCP?
Yes, you can select multiple files or folders and drag them between your local and remote directories to transfer them simultaneously.


