
One of the most common techniques for connecting to the Internet and accessing the public network is to connect to WiFi. The way to activate WiFi varies depending on the environment installed on popular Linux distributions. WiFi in major Linux variants can be configured and disabled via the desktop environment as well as the command line. Most popular Linux distributions provide GNOME and KDE desktop experiences by default; additionally, applying specific settings in graphical environments is inherently easier than making changes in the terminal environment, and you may quickly enable and disable WiFi in graphical environments.
Using the command line to activate WiFi is not difficult, and some Linux distributions make it quite easy to apply settings using the graphical user interface. Especially because scripts are already being written to enable and disable WiFi to make it easier for Linux users to update their settings.
In this post, we will show you how to enable and disable WiFi in Kali Linux, one of the most contemporary and appealing Linux distributions. You have already become acquainted with Kali Linux via the desktop interface and the command line. As a result, you are free to choose the way that is most convenient for you to implement your changes. Follow the procedures below to enable or disable WiFi on Kali Linux.
Using the GUI, enable and disable WiFi on Kali Linux.
The methods for connecting to WiFi in the KDE, GNOME, and Xfce desktop environments are nearly identical. To enable or disable WiFi in the Kali Linux desktop environment, follow the procedures below.
To begin, locate the network icon in the Taskbar, which is placed on the right side of the screen, near the top, next to the clock.
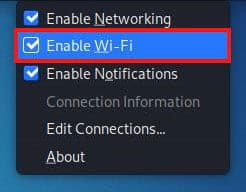
Then, if you wish to connect to WiFi, right-click on the Network icon and choose “Enable Wi-Fi” from the list of options.
Check the Disable WiFi option to disable the WiFi connection.
–
After activating the WiFi adapter, right-click on the Network icon and select the WiFi network to which you wish to connect from the list of accessible WiFi networks.
When you select a WiFi network, a popup will appear asking for the password to connect to that network. After you’ve entered your password, click the “connect” button to finish the process. Then, by selecting the Network icon, you can connect to the WiFi network and the Internet.
After connecting to WiFi, right-click on the Network icon from the menu and select “Connection Information” to examine information about the WiFi network and your connections.
ALSO READ : How to Allow Access Through a Port in the Windows VPS Firewall
Using the terminal, enable and disable WiFi networking in Kali Linux.
In Kali Linux, you can connect to the desired WiFi network using various commands. We will show you how to connect to wifi in Kali using the command line.
-
Connect to a WiFi network using iwlist.
To connect to a network in the terminal environment, the first step is to scan and locate available networks. The iwlist command can assist you in this regard:
iwlist wlan0 scan
The output displays available networks; to connect to the selected network, use the grep command to get a more usable output and connect to the target network more simply. Because we will be accessing the ESSID (Extended Service Set Identifier) network in this tutorial, use the following command to obtain the output of ESSID networks:
iwlist wlan0 scan | grep ESSID
After you’ve identified the networks and accessed the network you wish to connect to, you can use several instructions to connect to it.
1. Using the nmcli command, connect Kali Linux to WiFi.
The nmcli command is a straightforward and practical way to handle NetworkManager and connect to the network. To use the nmcli command, enter the network name and password in the format shown below:
nmcli d wifi connect [The desired network name ] password[The desired network password]
You will be connected to the appropriate network after running the above command. If you need assistance with the nmcli command, you can consult its documentation.
2. Use the nmtui command to connect to WiFi in Kali Linux.
Like the nmcli command, the nmtui command allows you to control NetworkManager. Type the following command to connect to the selected WiFi network:
nmtui
- After running the above command, the menu shown in the image below will be presented for you; use the keyboard to pick the “Activate a connection” option and then press the Enter button.
- You will see the various networks in the menu that will be displayed again; select the desired choice using the keyboard and then click Enter.
- To connect, you must first have access to the Internet, and then you must have access to the WiFi network you desire.
- After connecting to the appropriate network, hit Enter and then select the Back option.
- Select Quit and press Enter to exit the nmtui command prompt.
Select Quit and press Enter to exit the nmtui command prompt.
Another way to connect to a WiFi network is to use the ip command. To access the desired WiFi adapter name and connection details (if you were already connected to a network), enter the following command in the terminal environment:
$ ip a
If you want to disable your WiFi connection, run the following command:
sudo ip link set dev [name of desired WiFi ] down
Also, to enable WiFi by Backupping your desired adapter run the following command:
sudo ip link set dev [name of desired WiFi ] up
You can run theip a command again to check the WiFi connection.
Troubleshooting Wi-Fi Issues:
No technology is without its quirks. We’ll help you identify and resolve common Wi-Fi problems, ensuring a stable connection throughout your Kali Linux experience.
This problem is uncommon on Kali Linux, however if you experience it, run the following command to troubleshoot:
sudo apt install kali-linux-wireless
Of course, this problem may be related to the failure of your wireless card, so it is better to identify your network device name first so that you can make the necessary settings:
iwconfig
After you’ve determined the name of your network device, execute the following command:
ifconfig[wireless card name ] up
Why does Kali Linux Enable WiFi not appear?
One issue that Kali Linux users may have is the failure to display Enable WiFi in Kali Linux. This problem develops due to the diverse software and hardware configurations of users’ computers, however there are certain ways that can solve it.
While the Kali Linux system uses the internal WiFi adapter, you must determine the driver that the device uses to remedy this problem. Enter the following command to accomplish this:
lspci -nnk | grep –iA2 net
Running the preceding command will provide you with detailed information about the network adapters on your Kali Linux system. After determining the desired adapter, use the modprobe command to load the desired driver.
For example, if the ath9k_htc drive is used for the adapter, the following command must be used to load the desired drive:
modprobe ath9k_htc
After running the above command, your problem should be resolved, and you should be able to see a list of available WiFi networks. If your problem is not resolved, install the firmware-Atheros package, which contains firmware for Atheros-based wireless adapters.
ALSO READ : Connecting to Your Ubuntu Server via RDP (Remote Desktop Protocol)
Conclusion
In this tutorial, you learned how to connect to a WiFi wireless network using your Kali Linux operating system’s graphical environment and command line. The advantage of Linux is that it provides users with multiple options for applying settings. You can connect to WiFi using both the graphical technique, which is a straightforward method, and the command line method.
Learning the command line approach will help you in a variety of scenarios, particularly in this course, because this method for connecting to WiFi is identical in most Linux versions. Furthermore, by connecting to WiFi via the terminal environment, you can simply troubleshoot and resolve issues such as a lost connection. On servers, the command line method usually works better.